# Construct XC development enviroment
# Overview
With the development of the XinChuang industry, the software and hardware application products has gradually realized domestic substitution, including operating systems, core chips, basic hardware, middleware, data servers, and more. To help users quickly get started with WebGIS project development in the context of XinChuang application products, this article will introduce how to build a WebGIS development environment and successfully create a WebGIS project using entirely domestic software and hardware:
- Build WebGIS Development Environment: Download and install the development tools for WebGIS development (development platform: Node.js; source code editor: Visual Studio Code; GIS server software platform: SuperMap iServer), and configure environment parameters.
- Prepare Map Services: Publish map services in SuperMap iServer and use them as datasources in the WebGIS project.
- Create the WebGIS Project: Create a WebGIS project based on SuperMap iClient for MapboxGL, and display maps and execute bounds query in a web browser.
# Build the WebGIS Development Environment
This chapter introduces the XinChuang hardware and software environment for this case, the WebGIS development environment, and how to install development tools. During the installation, some tools and softwares can be installed through either Graphical User Interface (GUI) or Command-Line Interface (CLI). Here we introduce both installation methods, and you can choose the one.
- Graphical User Interface (GUI): Display a computer operating user interface in graphical form. GUI is more intuitive in presenting functions compared to CLI and is easier to use, making it suitable for users accustomed to graphical systems.
- Command-Line Interface (CLI): It's an interface where you can type executable commands at a user prompt and it's usually does not support the mouse. The user enters commands through the keyboard, and the computer receives commands and executes it. CLI is more computationally efficient than GUI. The CLI is more efficient when users are familiar with commands.
# XinChuang Hardware and Software Environment
- Computer Model: Tianyi TR1263
- Operating System: Yinhe Kylin V10
- Kernel: Linux 5.4.18-53-generic
- CPU: Phytium D2000 with 8 cores, compatible with the 64-bit ARM v8 instruction set
- Memory: 16GB
- Hard Drive: 256GB SSD + 1TB M.2 Interface
# Configure the WebGIS Development Environment
In the above XinChuang hardware and software environment, download and install the development tools and software required for WebGIS development, and configure environment parameters. Here are the versions of tools and software.
- Node.js linux arm64 v14.21.3: Install
- Visual Studio Code Linux arm64 stable: Install
- SuperMap iServer 11i(2022) SP1 for Linux(arm64) 11.0.1: Install
# 1.Insatall Node.js
Node.js is an open-source and cross-platform JavaScript runtime environment that can also be used as a development platform to create server-side web applications. Click Node.js (opens new window) to download and install it.
(1)Download and extract Installation Package
- Graphical User Interface (GUI)
Based on the XinChuang hardware and software environment for this case, here we download Node.js in Linux arm64 v14.21.3.
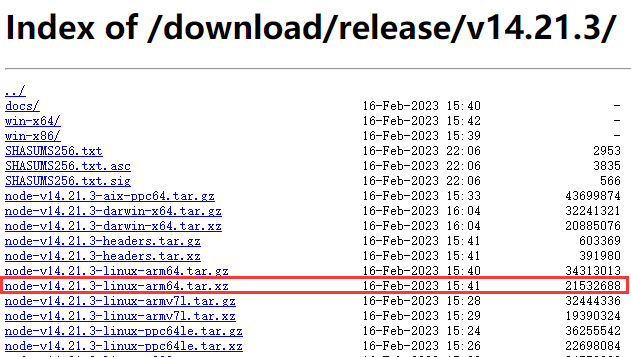
In the directory where the Node.js installation package is located, double-click to open the package, and click Extract to decompress the package into the target directory.
- Command-Line Interface (CLI)
Navigate to the installation directory, and enter the following commands in terminal to download and extract the Node.js installation package.
wget https://nodejs.org/download/release/v14.21.3/node-v14.21.3-linux-arm64.tar.xz
tar xvJf node-v14.21.3-linux-arm64.tar.xz
(2)Create Symbolic Links
In the terminal, enter the command ln -s source target to create a symbolic link, which indicates that the symbolic link file target points to the source file.
ln -s /home/download/node-v14.21.3-linux-arm64/bin/npm /usr/local/bin
ln -s /home/download/node-v14.21.3-linux-arm64/bin/node /usr/local/bin
(3)Verify Installation
In the terminal, enter node -v and npm -v to verify whether Node.js and npm have been successfully installed. If succeed, it will output the Node.js and npm version.
node -v
npm -v
# 2.Install Visual Studio Code
Visual Studio Code is a lightweight yet powerful source code editor, it comes with built-in support for syntax highlighting and API intelligence for JavaScript, TypeScript, and Node.js. It can run on desktop environments and is compatible with Windows, macOS, and Linux. Click Download Visual Studio Code (opens new window) to download and install it.
(1)Download and Extract Installation Package
- Graphical User Interface (GUI)
Based on the XinChuang hardware and software environment in this case, select Visual Studio Code in Linux Arm64 which has a .tar.gz suffix.
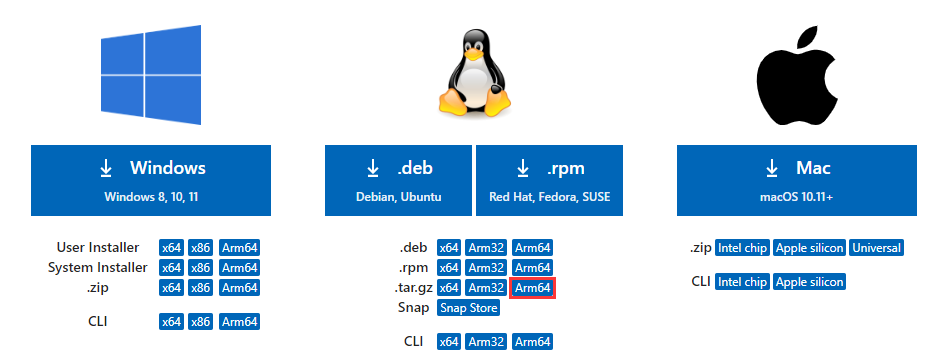
In the directory where the Visual Studio Code Arm64 installation package is located, double-click to open the package, and click Extract to decompress it.
- Command-Line Interface (CLI)
Navigate to the installation directory, and enter the following commands in terminal to download and extract the Visual Studio Code installation package.
wget https://az764295.vo.msecnd.net/stable/704ed70d4fd1c6bd6342c436f1ede30d1cff4710/code-stable-arm64-1681295764.tar.gz
tar -zxvf code-stable-arm64-1681295764.tar.gz
(2)Install Visual Studio Code
In the terminal, grant the user administrator privileges via the sudo command and then install Visual Studio Code.
sudo chmod 777 code-stable-arm64-1681295764.deb
sudo apt install -f ./code-stable-arm64-1681295764.deb
(3)Launch Visual Studio Code
Enter the following command in the terminal to launch Visual Studio Code.
code
# 3.Install SuperMap iServer
SuperMap iServer (hereinafter: iServer) is a cross-platform, enterprise-level server GIS software platform that provides comprehensive GIS services to meet the diverse GIS functional needs of various users, including map services, data services, and advanced analysis services, as well as various system services such as aggregation services and clustering services.
Click SuperMap | Technical Resource Center (opens new window) to download and install it. iServer offers convenient and easy-to-use installation packages, which can be used directly after extraction.
Note: You should obtain execution privileges to perform the following installation.
(1)Download and extract the Installation Package
- Graphical User Interface (GUI)
iServer currently provides installation packages with the .tar.gz extension, suitable for deployment on ARM-based 64-bit Linux operating systems. Enter the download page and save the installation package to your installation directory.
In the directory where the iServer installation package is located, double-click to open the package and click Extract to decompress the package.
- Command Line Interface (CLI)
Navigate to the installation directory and enter the following command in terminal to download the iServer installation package.
wget http://download.supermap.com.cn/2022/SuperMap_11i_2022_SP1/iServer/supermap-iserver-11.0.1-linux-arm64.tar.gz
tar -zxvf supermap-iserver-11.0.1-linux-arm64.tar.gz
(2)Start iServer
Ensure that the user has permission to execute start.sh. If not, enter the following command in the terminal to log in as the root user before starting iServer.
su
In the bin directory of the iServer installation package, execute the following command to start iServer.
./startup.sh
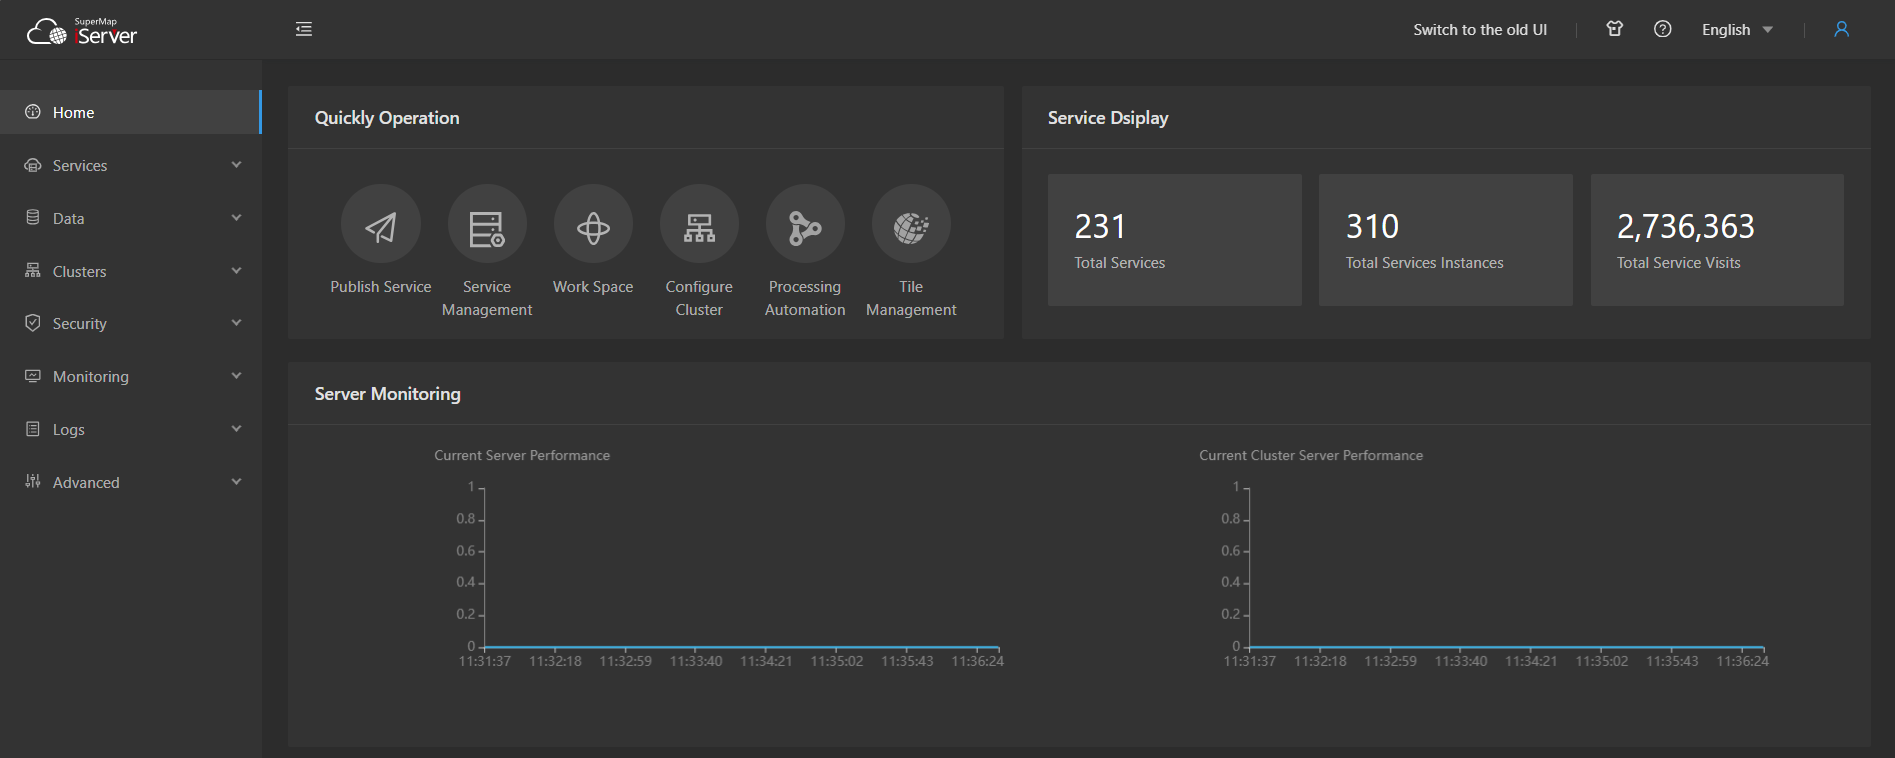
After starting iServer, access http://<server>:<port>/iserver/admin-ui/home in your browser (for example, the local access address: http://localhost:8090/iserver/admin-ui/home), and log in with the administrator account. After the license is configured, you can start using the map, data, analysis, and other services provided by iServer. License configuration instructions: iServer License Configuration | Linux System (opens new window).By the way, you can execute ./shutdown.sh in terminal to stop iServer.
# Prepare Map Services
In this section, we will publish the map services required for the WebGIS project in iServer. The map data uses World_Vector and World_Image in sample data provided by SuperMap. Download sampledata: Technical Resource Center | Downloads Sampledata (opens new window).
Note: To publish map services, you need to have the role of System Administrator (ADMIN) or Service Publisher (PUBLISHER) in iServer.
# Publish Services
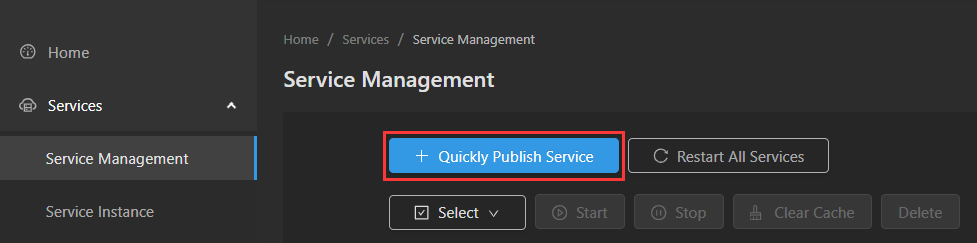
(1) Enter startup.sh in terminal to start iServer, access http://<server>:<port>/iserver/admin-ui/home in your browser and log into your administrator account. Click Services > Service Management in the left navigation menu > click Quickly Publish Services on the right.
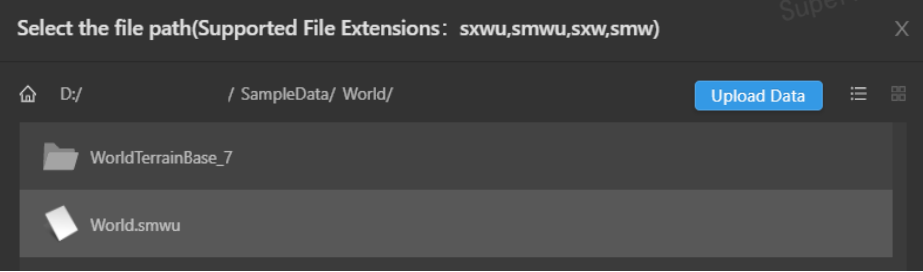
(2) On the service publishing page, select File Workspace as the datasource > click Next > click Upload Data to upload the workspace World.smwu, the workspace can be found in: [sample data package]/2DMap/World/World.smwu.
(3)Select REST-Map Service > click Next to configure the map service. Since there are no configuration items for the selected service, click Publish to publish the service directly.

# View Service Information
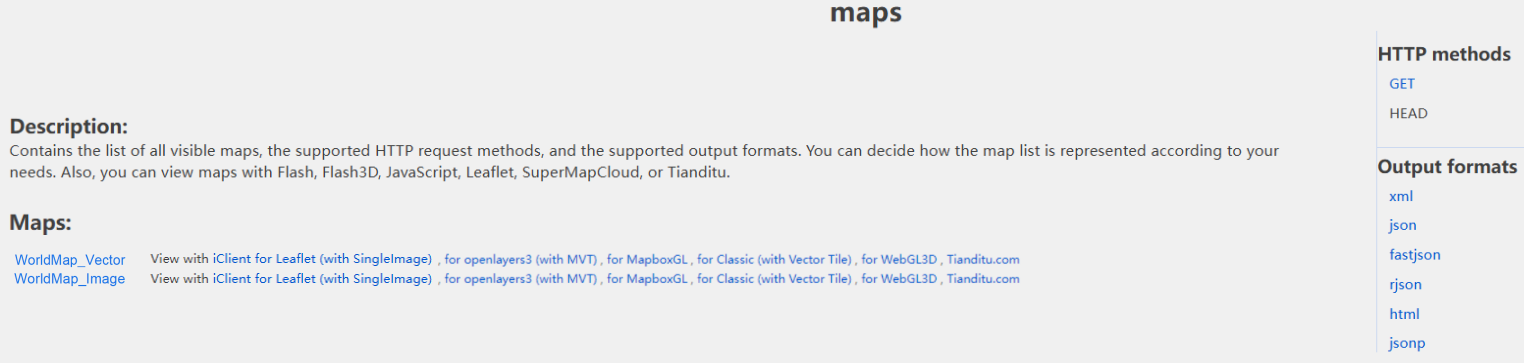
View the map service map-World in the service list. In the home > maps path, you can view the map list of current map service:
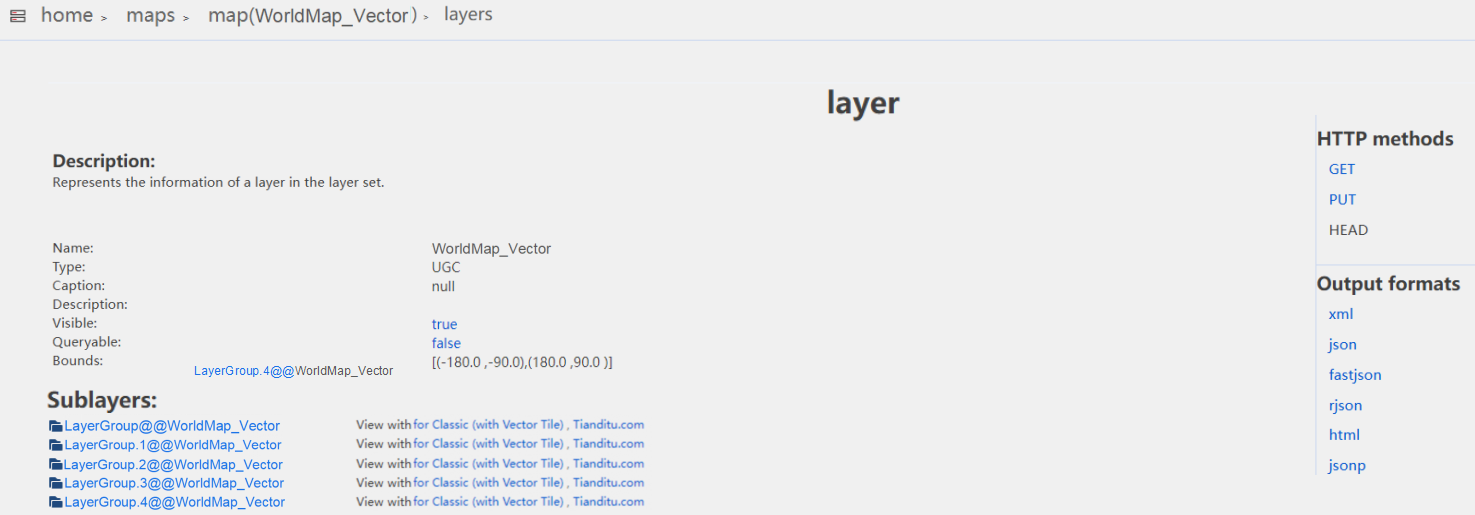
In home > maps > map(map_name) > layers, you can view the layer information of current map service. Click the sublayer in the sublayer list, you can view the datasource of current sublayer.
# Create a WebGIS Project
Based on the present development environment, this chapter will create a basic webpack project. Then taking the development with SuperMap iClient for MapboxGL as an example, we will guide how to include and configure SuperMap iClient for MapboxGL, and set the webpack project as one suitable for WebGIS development. Based on this project, we will implement displaying maps and bounds query in the browser.
During the creating process, it will use diff blocks to show modifications of directories, files, and code. For instance:
+ this is a new line you shall copy into your code
- and this is a line to be removed from your code
  and this is a line not to touch
# Create a webpack Project
# 1.Create Project
Create a project folder, initialize a package management configuration file package.json, which is used to record configurations related to the project.
mkdir webpack-demo
cd webpack-demo
npm init -y
The default package.json looks like this:
{
  "name": "webpack-demo",
  "version": "1.0.0",
  "description": "",
  "main": "index.js",
  "scripts": {
    "test": "echo \"Error: no test specified\" && exit 1"
  },
  "keywords": [],
  "author": "",
  "license": "ISC"
}
- name: The name of the project;
- version: The version of the project;
- description: The brief description of the project;
- main: The main entry point of the project;
- scripts: Shortcuts for executing npm script commands;
- keywords: Keywords related to the project;
- author: The developer of the project;
- license: The license terms for the software.
# 2.Project directory
Create the following directory structure in the project's root directory:
webpack-demo
+ |- /dist
+ |- /src
+    |- index.js
  |- package-lock.json
  |- package.json
- ./dist: The distribution code folder where place the compiled, minimized, and optimized output. The code in this folder will ultimately be loaded in the browser;
- ./src: The source code folder, where store the raw, editable code;
- ./src/index.js: The default execution file for the project.
In package.json, modify the path to the project's default execution file.
+  "main": "./src/index.js",
-  "main": "index.js",
# 3.Import dependency
Introduce the following development dependencies to assist development, which are required for the project development environment but not for production enviroment. When running npm install command to install dependencies, npm will automatically record the names and versions of the dependencies in package.json.
npm install webpack@5.82.1 --save-dev
npm install webpack-cli@5.1.1 --save-dev
npm install webpack-dev-server@4.15.0 --save-dev
npm install events@3.3.0 --save-dev
npm install process@0.11.10 --save-dev
- webpack: A front-end resource modularization and packaging tool that can bundle many loose modules into front-end resources suitable for production environment deployment based on dependencies and rules;
- webpack-cli: Used to run webpack in command line;
- webpack-dev-server: Provides a simple web server with live reloading functionality;
- events: A core module of Node.js used for interaction between user code and the Node.js underlying event loop, and is relied upon by most modules;
- process: Provides a set of tools for interacting with the current process.
Note: After npm5, running npm install will automatically generate package-lock.json. When installing project dependencies, this file will be used primarily to parse and install the specified version of the package, instead of using package.json.
# 4.Configure the Project
In the project's root directory, create a webpack configuration file webpack.config.js for project settings. Now the project directory structure is:
webpack-demo
  |- /dist
  |- /src
      |- index.js
  |- package-lock.json
  |- package.json
+ |- webpack.config.js
In the webpack.config.js, perform some basic configurations for the project. Learn more configuration options: webpack configuration doc (opens new window).
(1) Configure entry to tell webpack where to start building the bundle, indicating that webpack should start packaging from index.js as the entry point of the project and import the path module for handling file and directory paths.
 const path = require('path');

 module.exports = {
   entry: {
     index: './src/index.js',
  },
 }
(2) Configure output to instruct webpack how and where to output the bundle, assets, and any other content packaged or loaded using webpack.
module.exports = {
+  output: {
+    filename: 'bundle.js',
+  },
}
(3) Configure mode to inform webpack to use built-in optimizations for the corresponding mode.
module.exports = {
+  mode: "development",
}
(4) Configure devServer to serve the files in the dist directory at localhost:8080(serve: put the resource as a server accessible file).
module.exports = {
+  devServer: {
+   open: true,
+   static: {
+     directory: path.resolve(__dirname, "dist")
+   }
+ },
 }
(5) Configure the plugin webpack.ProvidePlugin to automatically load modules without having to import or require them.
+ const webpack = require('webpack');

module.exports = {
+   plugins: [
+   new webpack.ProvidePlugin({
+     process: 'process/browser.js',
+   })
+ ]
}
# 5.Add Script Commands
Add the following script commands to package.json:
- Run
npm run dev, it can start a local development server and you can view the project's effects in real-time after code changes, eliminating the need to rebuild the project each time you update the code. - Run
npm run build, it can packages the project.
    "scripts": {
-     "test": "echo \"Error: no test specified\" && exit 1"
+     "test": "echo \"Error: no test specified\" && exit 1",
+     "dev": "webpack-dev-server",
+     "build": "webpack"
    },
# 6.Project File Code
Now you have build a basic webpack project successfully. Here are the project directory structure and the complete code for part of the files.
- Project directory structure
webpack-demo
|- /dist
|- /src
    |- index.js
|- package-lock.json
|- package.json
|- webpack.config.js
- package.json
  {
    "name": "webpack-demo",
    "version": "1.0.0",
    "description": "",
    "main": "./src/index.js",
    "scripts": {
      "test": "echo \"Error: no test specified\" && exit 1",
      "dev": "webpack-dev-server",
      "build": "webpack"
    },
    "keywords": [],
    "author": "",
    "license": "ISC",
    "devDependencies": {
      "html-webpack-plugin": "^5.5.1",
      "webpack": "^5.82.1",
      "webpack-cli": "^5.1.1",
      "webpack-dev-server": "^4.15.0"
    }
  }
- webpack.config.js
const path = require("path")
const webpack = require('webpack');

module.exports = {
  entry: {
    index: './src/index.js',
  },
  output: {
    filename: "bundle.js"
  },
  mode: "development",
  devServer: {
    open: true,
    static: {
      directory: path.resolve(__dirname, "dist")
    }
  },
  plugins: [
    new webpack.ProvidePlugin({
      process: 'process/browser.js',
    })
  ]
}
# Configure a WebGIS Development Environment
To make the webpack project suitable for WebGIS development, it requires additional WebGIS environment configurations.
# 1.Import iClient
SuperMap iClient for MapboxGL is a cloud-based GIS web client development platform built on MapboxGL v1. It provides comprehensive and professional GIS capabilities along with excellent visualization features. Here we will introduce the latest version of SuperMap iClient for MapboxGL as a runtime dependency for the project, which is needed in the production environment.
npm install @supermapgis/iclient-mapboxgl --save
# 2.Configure the iClient Development Environment
When using SuperMap iClient for MapboxGL for WebGIS development, it requirest to import additional development dependencies.
npm install stream-browserify@3.0.0 --save-dev
npm install util@0.12.5 --save-dev
- html-webpack-plugin: This plugin is used to embed webpack-bundled files (such as JS and CSS files) into an HTML file.
- stream-browserify: This provides a series of functions similar to the stream module in Node.js, allowing for the processing of large amounts of data streams in the browser while avoiding excessive memory usage.
- util: This provides a collection of commonly used functions, intended to supplement the functionality of core JavaScript.
In webpack.config.js, configure the additional modules required by SuperMap iClient for MapboxGL. resolve is used to set how modules are resolved.
module.exports = {
+  resolve: {
+    fallback: {
+      fs: false,
+      stream: require.resolve('stream-browserify'),
+      url: false,
+      querystring: false,
+      util: require.resolve("util"),
+      buffer: false
+    }
+  },
 }
# 3.Install Plugins
Import html-webpack-plugin. When using webpack to bundle your application, html-webpack-plugin will create an HTML file and automatically insert the static files bundled by webpack into this HTML file.
npm install html-webpack-plugin@5.5.1 --save-dev
In webpack.config.js, configure the plugin html-webpack-plugin.
+ const HtmlWebpackPlugin = require("html-webpack-plugin")

module.exports = {
    plugins: [
+    new HtmlwebpackPlugin({
+      title: "Output Management",
+      filename: "index.html",
+      template: "index.html"
+    }),
      ]
}
- title: The title of the generated HTML document;
- filename: The file to write the HTML to, the default to index.html;
- template: The relative or absolute path to the webpack template;
Create index.html in the root directory of your project, which will serve as the template file configured in HtmlWebpackPlugin. The code of index.html :
<!DOCTYPE html>
<html lang="en">
<head>
    <meta charset="UTF-8">
    <title>test</title>
    <link href="https://cdn.bootcss.com/mapbox-gl/1.12.0/mapbox-gl.css" rel="stylesheet">
</head>
<body style="margin: 0;overflow: hidden;background: #fff;width: 100%;height:100%;position: absolute;top: 0;">
<div id="map" style="margin:0 auto;width: 100%;height: 100%"></div>
<script src="../dist/bundle.js"></script>
</body>
</html>
# 4.Project File Code
Now we have create a project suitable for WebGIS development. Here are the directory structure of the project and the complete code for part of the files.
- Project directory
webpack-demo
  |- /dist
  |- /src
     |- index.js
  |- index.html
  |- package-lock.json
  |- package.json
  |- webpack.config.js
- package.json
  {
    "name": "webpack-demo",
    "version": "1.0.0",
    "description": "",
    "main": "index.js",
    "scripts": {
      "test": "echo \"Error: no test specified\" && exit 1",
      "dev": "webpack-dev-server",
      "build": "webpack"
    },
    "keywords": [],
    "author": "",
    "license": "ISC",
    "devDependencies": {
      "webpack": "^5.82.1",
      "webpack-cli": "^5.1.1",
      "webpack-dev-server": "^4.15.0"
      "events": "^3.3.0",
      "process": "^0.11.10",
      "html-webpack-plugin": "^5.5.1",
      "stream-browserify": "^3.0.0",
      "util": "^0.12.5",
    },
    "dependencies": {
      "@supermapgis/iclient-mapboxgl": "^11.0.1"
     }
  }
- webpack.config.js
const path = require("path")
const HtmlWebpackPlugin = require("html-webpack-plugin")
const webpack = require('webpack');

module.exports = {
  entry: {
    index: './src/index.js',
  },
  output: {
    filename: "bundle.js"
  },
  mode: "development",
  devServer: {
    open: true,
    static: {
      directory: path.resolve(__dirname, "dist")
    }
  },
  resolve: {
    fallback: {
      fs: false,
      stream: require.resolve('stream-browserify'),
      url: false,
      querystring: false,
      util: require.resolve("util"),
      buffer: false
    }
  },
  plugins: [
    new HtmlWebpackPlugin({
      title: "Output Management",
      filename: "index.html",
      template: "index.html"
    }),
    new webpack.ProvidePlugin({
      process: 'process/browser.js',
    })
  ]
}
# WebGIS Development Example
Next, we will develop a simple WebGIS function based on the WebGIS project we just created. We will implement a bounds query function after displaying a map in the browser.
# 1.Import Modules
In src/index.js, import MapboxGL and SuperMap iClient for MapboxGL.
import mapboxgl from "mapbox-gl"
import "@supermapgis/iclient-mapboxgl"
# 2.Create a Map
Add the following code to display the map in the browser, and add logo and navigation control.
var map;
var url =
  "http://localhost:8090/iserver/services/map-World/rest/maps/%E4%B8%96%E7%95%8C%E5%9C%B0%E5%9B%BE_%E7%9F%A2%E9%87%8F";
var attribution =
  "<a href='https://www.mapbox.com/about/maps/' target='_blank'>© Mapbox </a>" +
  "with <span>© <a href='https://iclient.supermap.io' target='_blank'>SuperMap iClient</a> | </span>" +
  " Map Data <span>© <a href='http://support.supermap.com.cn/product/iServer.aspx' target='_blank'>SuperMap iServer</a></span> ";

var map = new mapboxgl.Map({
  container: "map",
  style: {
    version: 8,
    sources: {
      "raster-tiles": {
        attribution: attribution,
        type: "raster",
        tiles: [
          "http://localhost:8090/iserver/services/map-World/rest/maps/%E4%B8%96%E7%95%8C%E5%9C%B0%E5%9B%BE_%E5%BD%B1%E5%83%8F/zxyTileImage.png?z={z}&x={x}&y={y}",
        ],
        tileSize: 256,
      },
    },
    layers: [
      {
        id: "simple-tiles",
        type: "raster",
        source: "raster-tiles",
        minzoom: 0,
        maxzoom: 22,
      },
    ],
  },
  center: [0, 0],
  maxZoom: 18,
  zoom: 2,
});
//Add logo control
map.addControl(
  new mapboxgl.supermap.LogoControl({ link: "https://iclient.supermap.io" }),
  "bottom-right"
);
//Add navigation control
map.addControl(new mapboxgl.NavigationControl(), "top-left");
- url: The map used for querying. Fill in the service address of WorldMap_Vector in the map service map-world from Publish Service;
- tiles: The map displayed as the basemap. Fill in the service address of WorldMap_Image in the map service map-world from Publish Service;
# 3.Spatial Query
Add the following code to implement the functionality of bounds query in the map.
map.on("load", function () {
  query();
});

function query() {
// Visualize the scope of the query
  map.addLayer({
    id: "polygonLayer",
    type: "fill",
    source: {
      type: "geojson",
      data: {
        type: "Feature",
        geometry: {
          type: "Polygon",
          coordinates: [
            [
              [71, 15],
              [136, 15],
              [136, 57],
              [71, 57],
              [71, 15],
            ],
          ],
        },
      },
    },
    paint: {
      "fill-outline-color": "blue",
      "fill-color": "rgba(0, 0, 255, 0.1)",
    },
  });
  // Bounds query parameters
  var param = new mapboxgl.supermap.QueryByBoundsParameters({
    queryParams: { name: "Capital_P@World" },
    bounds: new mapboxgl.LngLatBounds([71, 15], [136, 57]),
  });

// Bounds query
  new mapboxgl.supermap.QueryService(url).queryByBounds(
    param,
    function (serviceResult) {
      var recordsets =
        serviceResult &&
        serviceResult.result &&
        serviceResult.result.recordsets;

      var features = recordsets && recordsets[0] && recordsets[0].features;
      // Visualize bounds query results
      map.addLayer({
        id: "points",
        type: "circle",
        paint: {
          "circle-radius": 6,
          "circle-color": "#FFD700",
          "circle-opacity": 0.5,
          "circle-stroke-width": 2,
          "circle-stroke-color": "#FFA500",
          "circle-stroke-opacity": 0.5,
        },
        source: {
          type: "geojson",
          data: features,
        },
      });
    }
  );
}
- queryParams: The parameters for the bounds query. The query dataset is Capital_P in the sublayer LayerGroup.4, the sublayer is in the map WorldMap_Vector in the map service map-world from Publish Service.
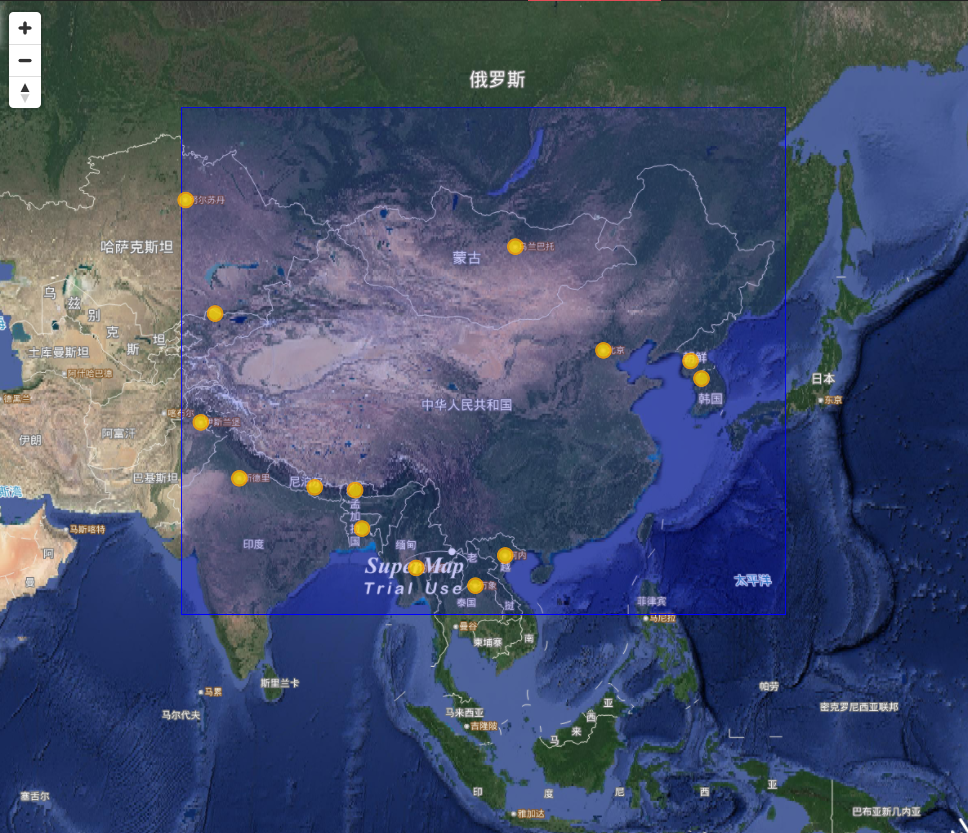
# 4.Start the Project
Execute the following command in the terminal to start the project. Once the project is successfully started, it will automatically open a page in the browser, and the bounds query result will be displayed on the map.
npm run dev
Bounds query result:
# 5.Source code
Now we have implement the map display and bounds query function in the WebGIS project. Here are the complete source code of src/index.js.
import mapboxgl from "mapbox-gl";
import "@supermapgis/iclient-mapboxgl";

var map;
var url =
  "https://iserver.supermap.io/iserver/services/map-world/rest/maps/World";
var attribution =
  "<a href='https://www.mapbox.com/about/maps/' target='_blank'>© Mapbox </a>" +
  "with <span>© <a href='https://iclient.supermap.io' target='_blank'>SuperMap iClient</a> | </span>" +
  " Map Data <span>© <a href='http://support.supermap.com.cn/product/iServer.aspx' target='_blank'>SuperMap iServer</a></span> ";

var map = new mapboxgl.Map({
  container: "map",
  style: {
    version: 8,
    sources: {
      "raster-tiles": {
        attribution: attribution,
        type: "raster",
        tiles: [
          "https://iserver.supermap.io/iserver/services/maps/rest/maps/World/zxyTileImage.png?prjCoordSys=" +
            encodeURIComponent('{"epsgCode":3857}') +
            "&z={z}&x={x}&y={y}",
        ],
        tileSize: 256,
      },
    },
    layers: [
      {
        id: "simple-tiles",
        type: "raster",
        source: "raster-tiles",
        minzoom: 0,
        maxzoom: 22,
      },
    ],
  },
  center: [0, 0],
  maxZoom: 18,
  zoom: 2,
});
map.addControl(
  new mapboxgl.supermap.LogoControl({ link: "https://iclient.supermap.io" }),
  "bottom-right"
);
map.addControl(new mapboxgl.NavigationControl(), "top-left");

map.on("load", function () {
  query();
});

function query() {
  map.addLayer({
    id: "polygonLayer",
    type: "fill",
    source: {
      type: "geojson",
      data: {
        type: "Feature",
        geometry: {
          type: "Polygon",
          coordinates: [
            [
              [0, 0],
              [60, 0],
              [60, 39],
              [0, 39],
              [0, 0],
            ],
          ],
        },
      },
    },
    paint: {
      "fill-outline-color": "blue",
      "fill-color": "rgba(0, 0, 255, 0.1)",
    },
  });

  var param = new mapboxgl.supermap.QueryByBoundsParameters({
    queryParams: { name: "Capitals@World.1" },
    bounds: new mapboxgl.LngLatBounds([0, 0], [60, 39]),
  });

  new mapboxgl.supermap.QueryService(url).queryByBounds(
    param,
    function (serviceResult) {
      var recordsets =
        serviceResult &&
        serviceResult.result &&
        serviceResult.result.recordsets;

      var features = recordsets && recordsets[0] && recordsets[0].features;
      map.addLayer({
        id: "points",
        type: "circle",
        paint: {
          "circle-radius": 6,
          "circle-color": "#007cbf",
          "circle-opacity": 0.1,
          "circle-stroke-width": 2,
          "circle-stroke-color": "#007cbf",
          "circle-stroke-opacity": 0.5,
        },
        source: {
          type: "geojson",
          data: features,
        },
      });
    }
  );
}
# Project package
You can bundle the WebGIS project after development. Execute the following command in the terminal. It will use the script src/index.js as the entry point, generate dist/bundle.js as the output, and HtmlWebpackPlugin will also generate a dist/index.html based on configuration, which automatically includes the bundled code.
npm run build
After executing the command, if the terminal outputs a message in the following format, it indicates that the project has been successfully bundled.
  Asset      Size     Chunks             Chunk Names
index.html  494 bytes        [emitted]
 bundle.js  70.4 MiB         [emitted]     index
The project directory is:
webpack-demo
    |- /dist
+     |- index.html
+     |- bundle.js
+   |- /node_modules
      |- /src
      |- index.js
    |- index.html
    |- package.lock.json
    |- package.json
    |- webpack.config.js
Now you have successfully create a project for WebGIS development and complete the package. You can do further development based on this project. More development guides: SuperMap iClient for MapboxGL | Development Guide (opens new window).