# ES Module
# Overview
In front-end development, in order to avoid accidental conflicts in variable names, reduce the complexity of code and improve the maintainability of code, the concept of modular development has gradually developed in the field of front-end technology, and a series of modular specifications such as AMD(Asynchronous Module Definition), CMD(Common Module Definition), CommonJS, ES Module have been launched.
ES Module (hereafter: ESM) is the mainstream module specification in JavaScript development. It is a module solution proposed by the JavaScript language specification ECMAScript 2015 standard (ES2015). ESM realizes the module function on the level of language standard, which have the concise syntax and simple implementation, and it is the common modular specification of browser and server.
This article will introduce ESM in the following aspects, and show you how to implement the development of WebGIS project based on ESM in SuperMap iClient JavaScript through a complete modular development example.
- ESM features: The advantages of ESM in browser compatibility and module loading;
- ESM basic syntax : Using ESM in a webpack project;
- Modular Development Example: Example of WebGIS development based on webpack project and ESM.
# ESM features
ES Module is a common module specification in modern JavaScript development, supports static loading, dynamic loading, and supports mainstream browsers.
- Static loading
The loading method of ESM is static, and it can determine the imported and exported variables and dependencies between modules during the compilation process. Compared with the dynamic loading of CommonJS modules, ESM module loading is more efficient. It supports code checking for imported and exported modules in the development stage, and can combine webpack and other tools to perform tree shaking in the packaging stage to reduce the size of the code package and shorten the running time of the program.
- Dynamic loading
After ES2020, ESM supports the dynamic import of modules using import() function, which can lazily load modules on demand at runtime instead of loading all modules at once when the application starts, effectively improving the performance and responsiveness of the application.
- Browser compatibility
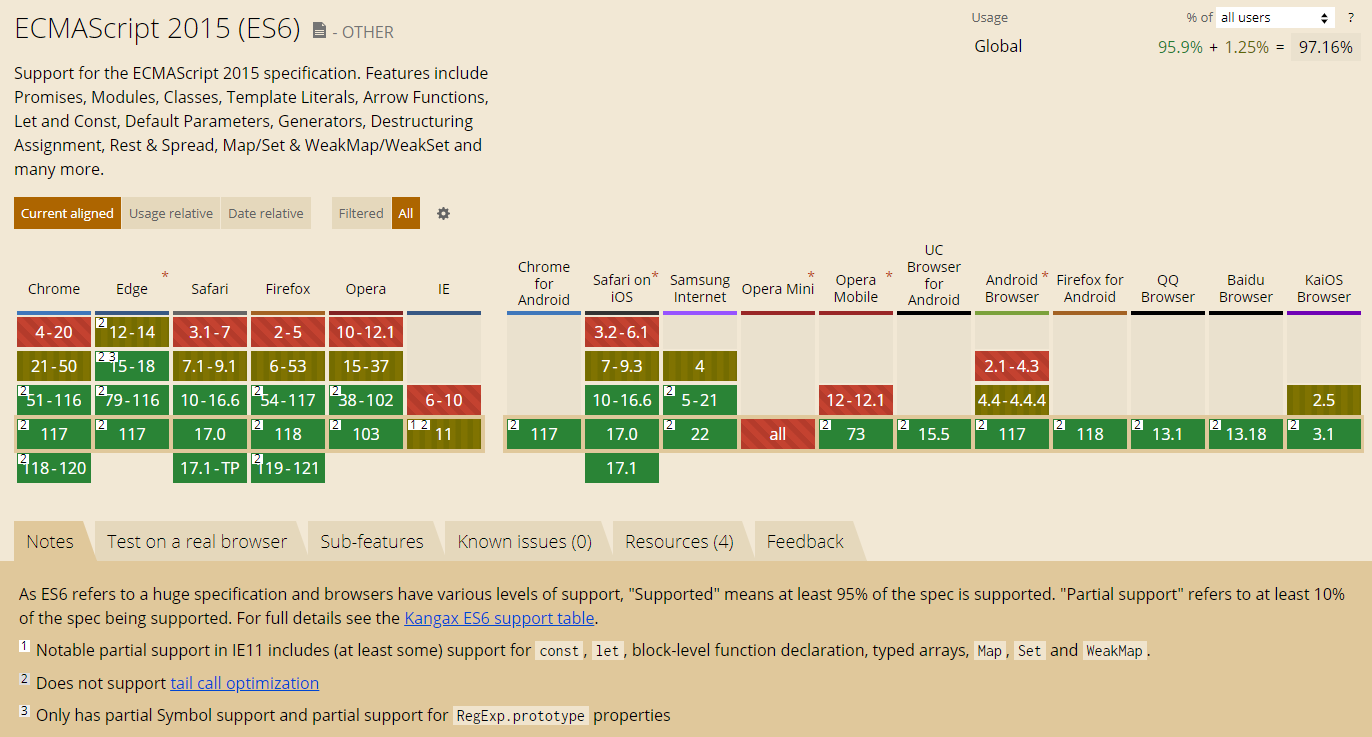
Modular specifications such as AMD, CMD, CommonJS are based on API specifications instead of ECMA, and they are not natiently supported by major browsers. ESM is a language-level specification. Major browsers like Chrome, Edge, Safari, and Firefox all support ESM natively. Browsers support ESM and their versions are listed below.
# ESM basic syntax
This section describes the basic syntax to use ESM, including how to identify a file as ESM, import and export.
- Identify a file as ESM
Set the file extension to
.mjs, the file is declared as ESM to ensure that the module file will be parsed correctly. In Node.js, you can force all files inpackage.jsonto use ESM by setting thetypeproperty tomoduleinpackage.json.
{
  "type": "module"
}
- Import
Use import keyword to import other modules into the current module. The import keyword is static and can only be used at the top level of the module.
// Import variables
import { CONSTANT, variable } from './module.js';

// Import all variables in the module
import * as module from './module.js';

// Import the default export in the module
import module from './module.js';

// Import the default export and other variables in the module
import module, { CONSTANT, variable } from './module.js';
To implement dynamic imports, you need to use import() function.
const module = await import(pathToModule);

async function renderWidget() {
    const container = document.getElementById('widget');
    if (container !== null) {
        const widget = await import('./widget.js');
        widget.render(container);
    }
}
renderWidget();
- Export
You can use export keyword to export the contents of a module to another module. And you can use export default keyword to do default exports, there can only be one default export per module.
// Export a variable
export const CONSTANT = 42;

// Export in default
const CONSTANT = 42;
export default CONSTANT;

// Export multiple variables
const name = '张三';
const CONSTANT = 42;
export { name, CONSTANT };

// Export all variables
export * from './module.js';
# Modular Development Example
This subsection describes how to import SuperMap iClient for Leaflet for modular development based on ESM in a webpack project, to achieve the function: display a map and perform map query by bounds in the browser.
# 1.Install Node.js
Before developing, you need to check whether Node.js, the JavaScript runtime environment, is installed on your computer. If not, you can download and install it from Node.js (opens new window). After installation of Node.js, it will come with npm, the Node.js package manager.
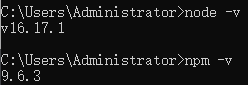
Open a command prompt and enter the following commands to verify that Node.js and npm have been installed successfully.
node -v
npm -v
If there are version numbers printed in the command line, it indicates that Node.js and npm has been installed successfully.
# 2.Create a webpack project
Create a basic webpack project for later modular development. In command line, enter the following command to create a project folder and initialize a package management configuration file package.json, to keep track of project configuration.
mkdir webpack-demo
cd webpack-demo
npm init -y
In the project root, create a source folder ./src and the project's default executable file ./src/index.js, then install the following development dependencies for the project.
npm install webpack@5.82.1 -D
npm install webpack-cli@5.1.1 -D
# 3.Configure development enviroment
To make the webpack project support WebGIS development, we need to import Leaflet and SuperMap iClient for Leaflet. SuperMap iClient JavaScript API supports ECMAScript 6 Promises, which can simplify asynchronous programming and make your code more elegant and easy to maintain. Here we import SuperMap iClient for Leaflet in the latest version as the running dependency for the project.
npm install @supermapgis/iclient-leaflet -S
# Import CSS file
in the project root, create a new basic HTML file index.html, and include the Leaflet CSS file and iclient-leaflet CSS file in the <head> tag.
<link rel="stylesheet" href="https://unpkg.com/leaflet@1.7.1/dist/leaflet.css"/>
<link rel="stylesheet" href="https://iclient.supermap.io/dist/leaflet/iclient-leaflet.min.css"/>
# Import modules
In index.js, use the import keyword in ESM to import the modules needed for development. Importing modules on demand can reduce the size of your project.
(1) Install @supermapgis/babel-plugin-import
npm install @supermapgis/babel-plugin-import -D
(2) In the project root, create a new .babelrc configuration file and add the following configuration.
{
    "plugins": [
        [
        "@supermapgis/babel-plugin-import",
            {
            "libraryName": "@supermapgis/iclient-leaflet"
            }
        ]
    ]
}
(3) In index.js, import components needed for development. In this case, we import TiledMapLayer to display map, and import QueryService and QueryByBoundsParameters to query map by bounds.
import L from 'leaflet';
import {TiledMapLayer,QueryService,QueryByBoundsParameters} from '@supermapgis/iclient-leaflet';
# 4.Develop a function
Now that we have set up the development environment, then in the webpack project, we will display a map and perform map query by bounds in the browser.
(1) In the <body> tag of index.html file, create a map container.
<body style="margin: 0;overflow: hidden;background: #fff;width: 100%;height:100%;position: absolute;top: 0;">
    <div id="map" style="margin:0 auto;width: 100%;height: 100%"></div>
</body>
(2) Add the following code to ./src/index.js, to display a map in the browser. Here we fill the url with the address of the map service WorldMap_vector published from SuperMap iServer.
const url = 'https://iserver.supermap.io/iserver/services/map-world/rest/maps/World';

const map = L.map('map', {
    preferCanvas: true,
    crs: L.CRS.EPSG4326,
    center: {lon: 0, lat: 0},
    maxZoom: 18,
    zoom: 2
});
new TiledMapLayer(url).addTo(map);
(3) Add the following code to the./src/index.js file, to specify the rectangle bounds for map query service.
function query() {
  const polygon = L.polygon([[0, 0], [39, 0], [39, 60], [0, 60], [0, 0]]);
  polygon.addTo(map);
  const param = new QueryByBoundsParameters({
    queryParams: { name: 'Capitals@World.1' },
    bounds: polygon.getBounds(),
  });
  new QueryService(url).queryByBounds(param, function (serviceResult) {
    const result = serviceResult.result;
    L.geoJSON(result.recordsets[0].features).addTo(map);
  });
};
query();
(4) Run webpack command to bundle the project. It will generate dist folder and main.js file in the root directory of the project, then add main.js file to index.html file.
<body style="margin: 0;overflow: hidden;background: #fff;width: 100%;height:100%;position: absolute;top: 0;">
    <script src="../dist/main.js"></script>
</body>
(5) Open the index.html in a browser, it will display the results of the map querying by bounds:

Now, you have built a webpack project based on ESM that can be used for WebGIS development! To know more about ESM, please see: webpack | conception | module (opens new window).