Use and Construction of Cluster |
Cluster refers to registering the SuperMap iServer service with a cluster server and providing a single customer view service. When a service request arrives at the cluster server, the cluster server uses cluster technology to uniformly allocate the SuperMap iServer service, and users do not need to know the specific GIS server that provides the service. The use of clusters can greatly improve the GIS services provided by SuperMap iServer in terms of high concurrency, high performance, and other aspects.
As a typical application of cluster technology, the distributed map cutting module of SuperMap iServer realizes the functions of distributed map cutting and distributed storage management.
In addition to the configuration in the service management server as described in this page, the configuration related to the cluster can also be configured through the config file. For details, please refer to Manage Clusters Using Configuration Files.
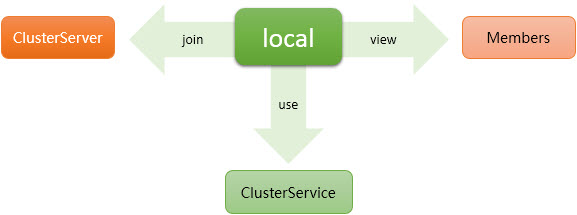
The following roles are included in the cluster system, and different roles construct the whole cluster system through different operations:
Figure 1 Cluster Overview
The above roles can be summarized as specific to a machine. For example, for this machine, I can be:
After a cluster child node joins the cluster, it will report to the parent node every 2 seconds. After receiving the report, the cluster parent node considers the child node to be an available child node and the child node will appear in the "cluster member list" of the cluster server. When a client or GIS application server sends a request to the cluster server (parent node), the cluster server will allocate the task to each cluster member (child node) based on load balancing principles, as shown in the following figure. Cluster members respond to requests and return the response results to the cluster server, which then returns the received response results to the client or GIS application server that sent the request. For example, when a client browses a map, the received map slices may come from different cluster members, rather than just from the cluster server requested by the client. In the following situations, the cluster server will determine that a cluster member has timed out and will not assign tasks to that member or forward assigned request tasks to other nodes for processing:
Time settings for connection timeout and response timeout can be set through config file. See Managing Cluster with Config File for details.
For a detailed introduction to the internal communication mechanism of the cluster system, please refer to Cluster System Communication Mechanism .
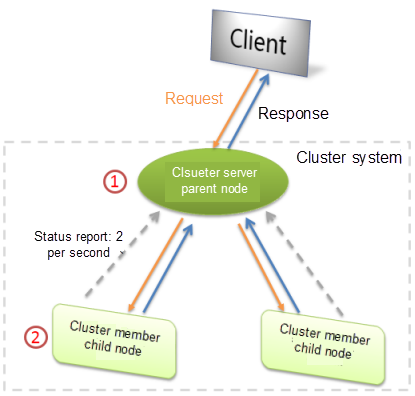
Figure 2 Cluster Communication Mechanism
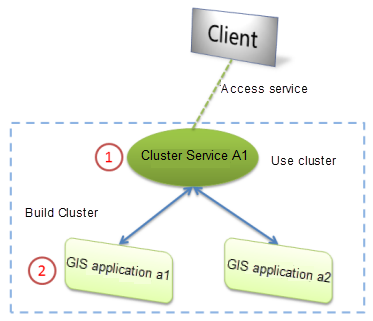
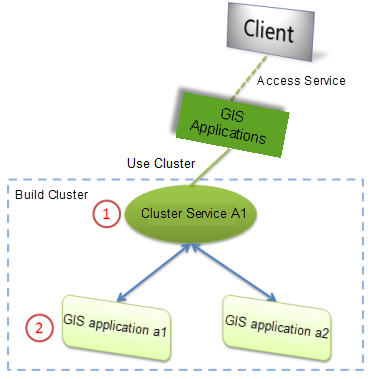
The GIS application server is a server that directly provides GIS services for the client. The performance and load of GIS services can be improved by using the cluster. The GIS application server provides high-performance services to the client for export.
The GIS application server uses the cluster in the following two ways:
|
|
|
|
Figure 3-1 Using the local cluster service |
Figure 3-2 Using other cluster services |
Multiple GIS servers can be clustered to improve performance. By default, SuperMap iServer's GIS servers have cluster functionality enabled and can accept child nodes to join at any time. As shown in Figure 3-1, identifier 2 directly joins the cluster service of identifier 1, forming a simple cluster. It is worth noting that identifier 1 supports the joining of multiple GIS servers, and can also join other clusters (in this case, forming a multi-layer cluster).
The parent node of the cluster (as shown by ID 1) is the cluster service device. Its main responsibility is to monitor and coordinate the child nodes to perform related tasks. It can perform security control on the entire cluster system. It can view the cluster members (child nodes) and decide whether to allow them to join the cluster. A clust parent node can "turn on" security controls to control that addition of child node.
If the parent node enables security control, the corresponding security token needs to be set. At this time:
After the enable security control, click the "Allow to join cluster" button corresponding to the child node in the node list to allow the child node to join the cluster. Click the "Prohibit joining the cluster" button to disable the child node to join cluster.
Note: When you configure cluster, the local node automatically joins the cluster server. When configuring a cluster, the same service address can only join the cluster once.
On the configure cluster page, you can view the node list of the cluster, including "Common node" and "Controlled node". A controlled node is a child node that joins a cluster in a controlled manner, referred to as Controlled Cluster . Click "view details" to view the service instance provided by the current child node in the current cluster system.
Note:
If you have enabled security control, you need to perform the "Allow to join cluster" operation to let the child node complete the join cluster.
In order to improve the efficiency of request forwarding in the cluster system, iServer uses asynchronous forwarding to process requests by default. You can implement asynchronous forwarding of requests in a clustered system without modifying any configuration.
If you need to further improve the efficiency of cluster system request forwarding through custom configuration, you can manually modify the configuration items of the cluster master node system configuration file (iserver-system. xml), specifically: The <clusterRequestClientSetting> sub item in <clustering>.If You need to further improve the efficiency of request forwarding of the cluster system through custom configuration, you can manually modify the configuration items of the config file (iserver-system. XML) of the cluster master node system. Specifically: < clusterRequestClientSetting > subitem in < clustering >.For detailed configuration instructions, please refer to the cluster forwarding parameter settings for managing clusters using configuration files.
The server as shown in ID 2 is the cluster sub-node, and the join cluster method is as follows:
Visit the sub-node service manager, click "Cluster-Join Cluster", enter the join cluster page, and click the "Join Cluster" button. Then fill in cluster alias, cluster service address and security Key (must be filled in when the cluster service is "enable security") in turn in the pop-up window, and select whether the node is "participates in distributed tiling" "or "Executes distributed computing", and click the "OK" button to complete the registration of the GIS server to the parent node.
There are two ways to configure a stand-alone cluster:
Take the ZIP product package of SuperMap iServer on the windows platform as an example. When configuring a cluster between two product packages, it is necessary to ensure that Tomcat uses a different port. Modify the port number of Tomcat in the zip package by modifying the %SuperMap iServer_HOME%/conf/server.xml. For example, <Server port="8016" ……>、<Connector port="8091"…… redirectPort="8454" ……>.
As long as the ports of multiple product packages are different, you can start service separately, and then build a cluster system by viewing Configure Cluster page.
This method can be used for stand-alone cluster configuration under other middleware.
SuperMap iServer supports starting with a specified configuration directory under Tomcat, so you only need to set different config files to use a single The iServer package configures a stand-alone cluster.
The specific application method is as follows:
In the windows environment, you can execute the following commands in the 【SuperMap iServer installation directory】\bin path to customize at the same time Tomcat's server.XML and SuperMap iServer's config file:
If you have configured the %JAVA_OPTS% environment variable, execute the following command to start service:
set JAVA_OPTS=%JAVA_OPTS% -Diserver.config="D:/WEB-INF1"
startup.bat -config="D:/server1.xml"
If you did not configure the %JAVA_OPTS% environment variable, execute the following command to start service:
set JAVA_OPTS=-Diserver.config="D:/WEB-INF1"
startup.bat -config="D:/server1.xml"
Stop service:
shutdown.bat -config="D:/server1.xml"