Configure to Use Multiworkers |
A single process cannot fully utilize system resources such as CPU and memory, while GIS services have high performance requirements due to their massive data and computationally intensive nature. Therefore, there is a strong demand for parallel computing and multiple processes. In order to fully utilize system resources, we used to enable multiple iServer services in a system by configuring a single machine cluster. It involves manual modification of port numbers and other operations, which are quite cumbersome.
Currently, iServer Standard, Advanced, and Ultra support multiworkers and provide a visual multi-process configuration to help you quickly create multiple iServer process. You only need to start multiple processes, and iServer automatically creates and starts multiple processes based on the number of processes you specify. In addition, with the iServer multi-process architecture, you can deploy independent services for each piece of data so as to realize the quarantine between different services in the process.
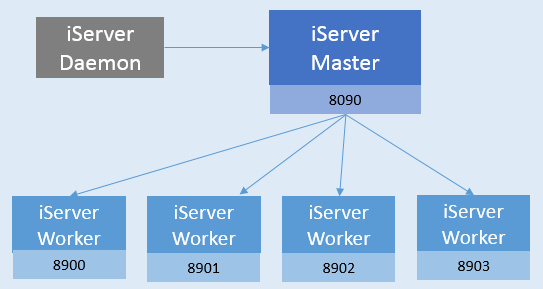
The iServer multi-process architecture has a Master and multiple Workers, as well as a to monitor the Master to avoid its failure Daemon character.
Enabling multiple processes means: iServer in the current operating system changes from a single process to multiple processes, while disabling multiple processes means from multiple iServer process becomes a single process.
You can refer to the following steps to configure and enable multiple processes on a single machine:
Note: On the multiprocessing configuration page, after enabling or disabling multiprocessing, you need to restart iServer for it to take effect.
In addition, you can configure the above information and the communication IP between the main process and the child process through the iServer System Config File.
The number of nodes of iServer multi-process supports dynamic scaling, and you can increase or decrease the number of nodes at any time according to the system conditions and usage requirements.
To add or subtract child nodes:
After making the above changes, you can view the currently running worker child nodes on the multiworkers page.
After enabling multiprocessing, the original iServer becomes a multiprocessing iServer Master node, and the Master automatically deploys the original GIS services of iServer in the newly added Worker node. The Master node is responsible for the unified management of Workers, including service management, security management, service monitoring, access statistics, log viewing, etc. for each Worker. That is to say, you only need to manage all GIS services on each Worker on the Master node, and you can:
In short, after enabling multiprocessing, although multiple iServer processes are automatically started, you do not need to manage each iServer separately. You only need to manage the services in all Workers uniformly through the Master node of the original port, just like managing a single iServer before.
The iServer supports multiple service instances. You can dynamically set the number of service instances, that is, allocate the number of Workers to the service. For example, if you set the number of instances of a service to n, the service will be allocated to n Workers, and these Workers will process the requests of the service. You can configure multiple instances in several ways:
How to enable multi-instance when release works pace is GIS service:
When publishing GIS services from other sources, the default publishing is multi-instance, and you do not need to manually enable multi-instance. You can directly modify the instance count in the following ways:
If you configure the service through the XML file, you can add parameters to the Service Providers Configuration to enable multiple instances. Set instance count in the Service Components Configuration. Details are as follows:
    <provider class="com.supermap.services.providers.UGCMapProvider"  enabled="true" name="map-World">
      <config class="com.supermap.services.providers.UGCMapProviderSetting">
         <workspacePath>E:/supermap_iserver_801_4/samples/data/World/World.sxwu</workspacePath>
          <multiThread>true</multiThread>
          <poolSize>0</poolSize>
          <ugcMapSettings/>
          <useCompactCache>false</useCompactCache>
          <extractCacheToFile>true</extractCacheToFile>
          <queryExpectCount>1000</queryExpectCount>
          <ignoreHashcodeWhenUseCache>false</ignoreHashcodeWhenUseCache>
          <cacheDisabled>false</cacheDisabled>
          <isMultiInstance>true</isMultiInstance>
       </config>
    </provider>
If the service source is not a workspace, the above parameters are not required.
    <component class="com.supermap.services.components.impl.MapImpl"  enabled="true" instanceCount="3" interfaceNames="rest"
 name="map-World" providers="map-World">
      <config class="com.supermap.services.components.MapConfig">
          <useCache>true</useCache>
          <useVectorTileCache>true</useVectorTileCache>
          <expired>0</expired>
          <cacheReadOnly>false</cacheReadOnly>
      </config>
    </component>
After modifying the number of service instances in the above way, you can go to the "Multi-process" page to view it. In addition, if you set the instance count to be more than number of workers, it will be the same as the number of workers by default, and the service will be allocated to all workers.
The advantage of configuring the number of instances lies in the rational allocation of resources. For example, for services with high resource consumption, multiple instances can be configured to get more resources, including CPU, memory, network bandwidth, etc. Thereby effectively improving the resource utilization rate and optimizing the service access efficiency.
The iServer supports the automatic recycling of work processes on a regular basis. After the iServer is started, the system will regularly detect and recycle work processes with abnormal resource occupation.
To enable automatic recycling of a worker process:
With the development of hardware technology, the general computer is multi-core configuration, which can improve resource utilization by using multi-process iServer. Specifically, the following scenarios can take advantage of multiple processes:
When iServer divides services by multiple processes, it will deploy services with data from the same workspace in one Worker, so when there are many data sources, using multiple processes can effectively quarantine services with different data.
After the iServer enables multiple processes, all Worker nodes are automatically participates in distributed tiling as graph cutting nodes, so the efficiency of single-machine graph cutting can be greatly improved.
In the aspect of data push, the cluster parent node needs to push task data to each child node in the traditional way (such as building a distributed graph cutting environment through a multi-machine cluster). For distributed graph cutting tasks based on multi-process creation, for read-only data files, such as read-only UDB data source, SMTiles file, etc. The parent node of the cluster only needs to push a task data to the designated location in the child node, and each Worker of the child node (with multiple processes enabled) obtains the data from this location when cutting the graph. As the number of graph-cutting tasks increases, so does the amount of data that needs to be pushed. In order to ensure the efficiency of graph cutting, each Worker The nodes all participate in the graph cutting, and there is no obvious difference between the nodes, so based on this method, you can manage the pushed data in a unified way.
If the distributed graph cutting is performed in the multiworkers mode, there is no need to push the task data, and the worker node can directly cut the graph from the Master The data is obtained, so that the data pushing time is saved, and the graph cutting efficiency is improved.
The multi-process architecture uses 8900-9000 ports by default, which are used to start the HTTP service. Please make sure that these ports are not occupied, otherwise the multi-process cannot be used normally.
For all ports used by SuperMap iServer by default, please refer to: Introduction to Ports.